Raspberry Pi Tunnel SSH - Remote Access Made Simple
Have you ever wanted to reach your Raspberry Pi when you're not at home, perhaps from a coffee shop or a friend's place? It's a common wish for many folks who enjoy working with these little computers. Sometimes, getting to your Pi from afar can feel a bit like trying to find a hidden path, especially when it's tucked away behind your home network's defenses. But there's a really neat trick that makes this possible, and it involves something called an SSH tunnel. This method helps you connect securely, giving you control over your Pi no matter where you happen to be.
This way of connecting, using a special kind of tunnel, helps you get to your Raspberry Pi's command line or even see its desktop screen. It's like creating a private, protected pathway directly to your device. This is super handy for anyone who needs to check on their projects, grab files, or just tinker with their Pi when they're not physically next to it. So, it means you can manage your Pi from almost anywhere, which is pretty convenient, actually.
The beauty of this approach is how it manages to keep things safe while still letting you reach your device. It builds a kind of shielded connection, so the information you send back and forth stays private. This is a big deal, as it helps keep your Pi and your data away from prying eyes on the wider internet. We'll talk about how this all comes together, and what options you have for setting up these useful connections, too.
- Penchod Meaning In English
- Kenny Loggins Siblings
- Xnxxdavid Goggins
- Annaxnasty
- Is Pauly Shore Still Alive
Table of Contents
- What is Raspberry Pi Tunnel SSH and Why Use It?
- How Does Raspberry Pi Tunnel SSH Keep Things Safe?
- Different Ways to Set Up Raspberry Pi Tunnel SSH
- Are There Other Options for Raspberry Pi Tunnel SSH?
- Getting Started with Raspberry Pi Tunnel SSH - What to Know?
What is Raspberry Pi Tunnel SSH and Why Use It?
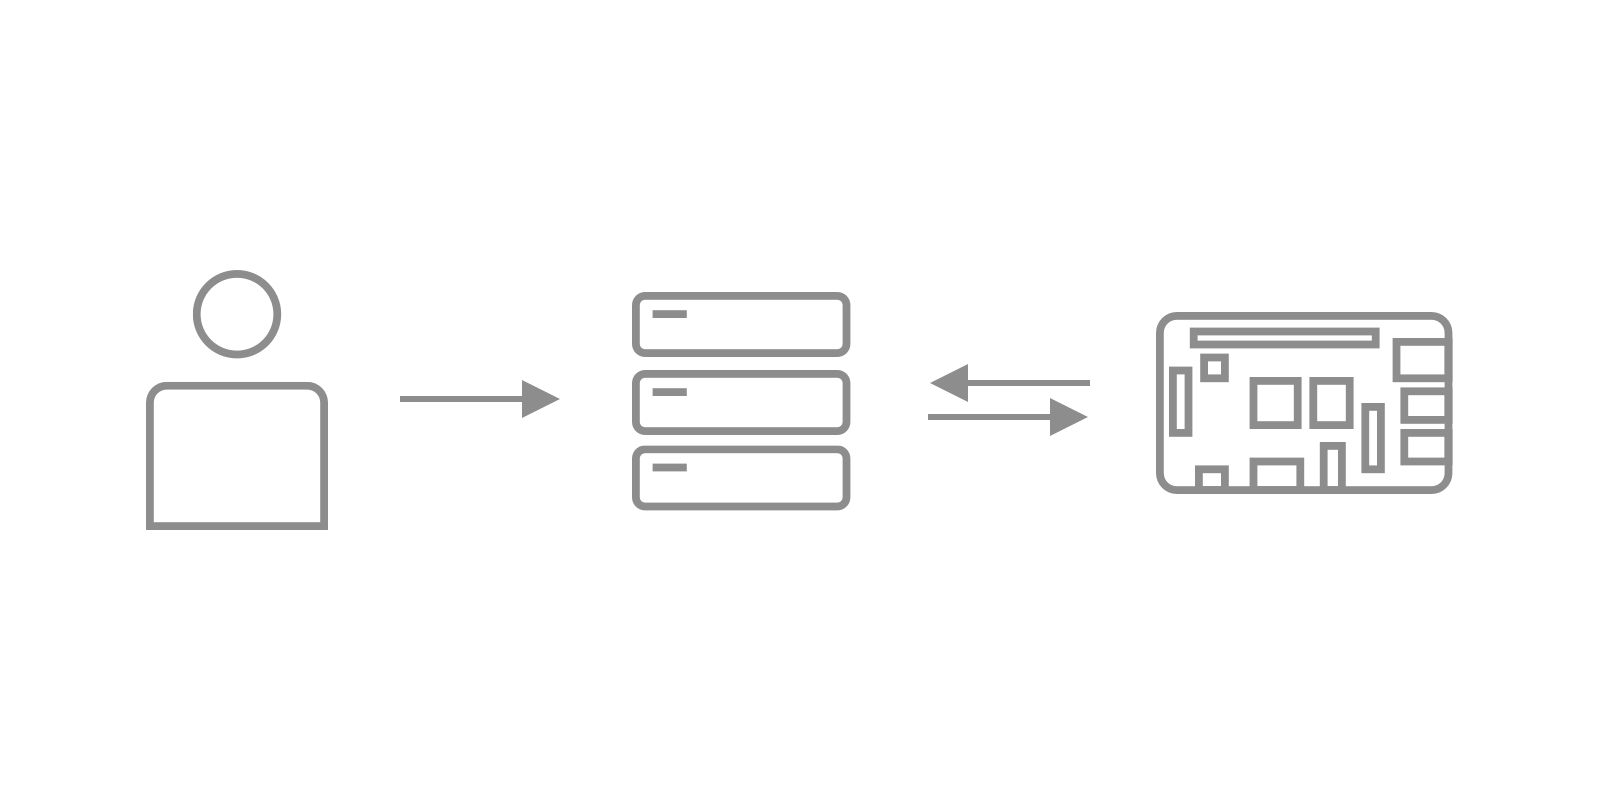
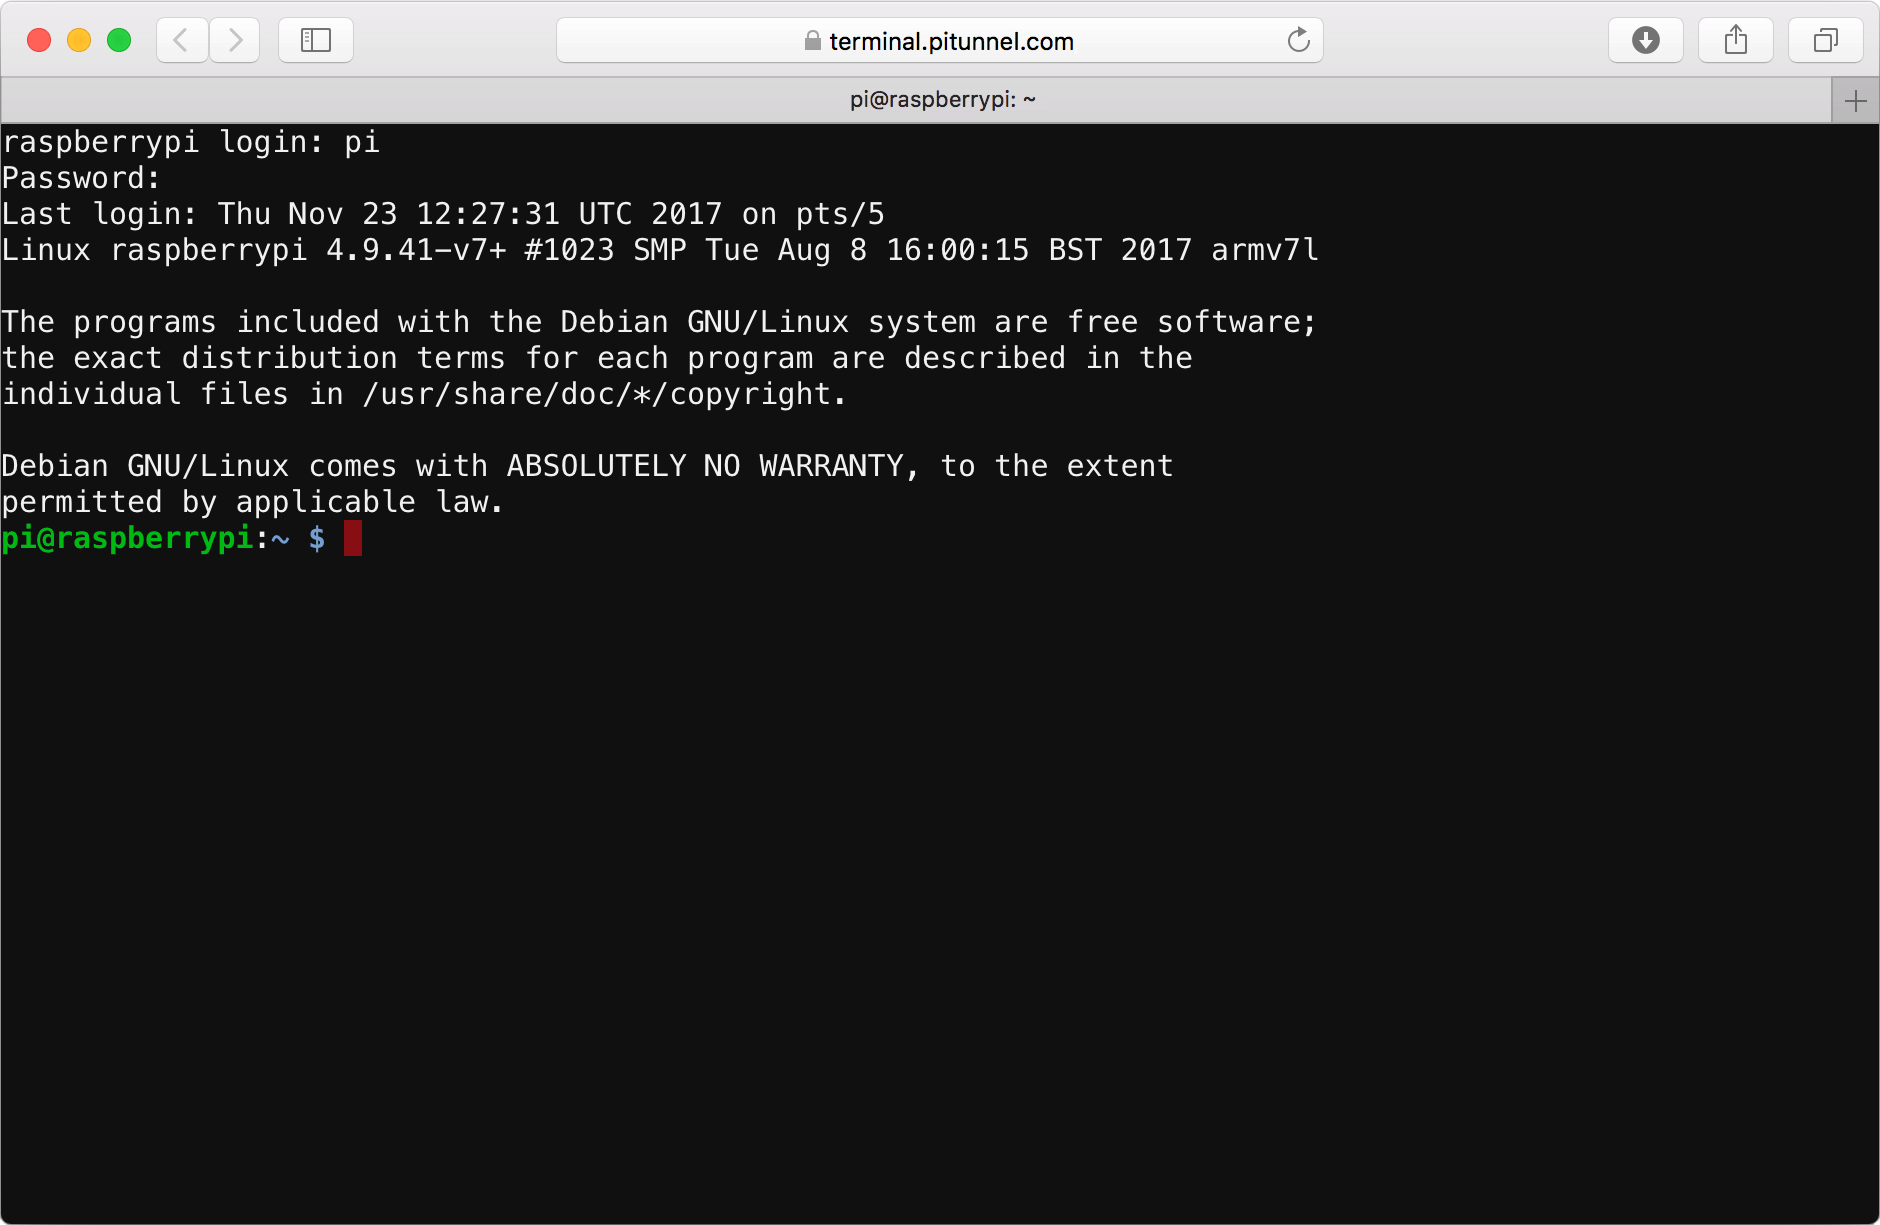
You might be wondering what this whole idea of a tunnel for your Raspberry Pi is all about. Well, imagine you have your little computer at home, and you're out and about, maybe at a coffee shop or visiting family. You want to get to your Pi's files or run some commands, but your home network usually keeps it private. This is where a custom tunnel comes into play. It lets you reach your Raspberry Pi's SSH, which is a way to control it using text commands, from an outside spot. For example, you might get an address like pitunnel.com:12345, which makes it feel like your Pi is right there with you, in a way.
These special tunnels are made by typing a simple set of instructions into your Raspberry Pi's terminal window. It's not too difficult, really, and once it's set up, you can make your Pi's SSH accessible over the open internet. You could also use it within a virtual private network, or even with an external service that helps with remote viewing, like RealVNC's cloud VNC viewer. This opens up a lot of possibilities for staying connected to your Pi, so it's quite handy.
There's also Raspberry Pi Connect, which is a service that lets you share your screen and use a remote command line, and it's free, too. This is another way to keep tabs on your Pi. The main idea behind using these tunnels is to create a secure path. When you compare different ways to do this, using SSH tunneling to make your Raspberry Pi's SSH available to another machine means you can get to its console from just about anywhere. It's a pretty neat trick, actually.
Making Connections with Raspberry Pi Tunnel SSH
Setting up an SSH tunnel can really make your remote access to your Raspberry Pi much safer. It's like putting a strong shield around your connection. By putting a layer of protection around your connection, you help keep your private information safe and reduce the chances of problems that come with putting your device directly onto the internet. This is a big plus for anyone who cares about keeping their data private, you know?
Sometimes, when you try the first set of instructions on your Pi, it might seem to do something a little unexpected. For instance, when I tried it, all it did was start a new SSH connection from the Pi to another computer I was using, like an EC2 instance. This meant I could control that other computer through the connection I had made to control the Pi. It might seem a bit odd at first, but this is actually how it's supposed to work. The tunnel gets made anyway, which is the main thing.
Raspberry Pi secure SSH lets you get to another computer from afar. If you want to know how to use SSH to connect to your Raspberry Pi from a Windows, Mac, or Ubuntu computer, there are guides that explain it all. This helps you understand the basics before you even get to the tunneling part. The goal is to make it easy for you to reach your Pi, no matter what kind of computer you're using to connect, so it's quite flexible.
How Does Raspberry Pi Tunnel SSH Keep Things Safe?
When you're thinking about connecting to your Raspberry Pi from somewhere else, safety is a big deal. You want to make sure that whatever you're doing, and whatever information you're sending, stays private. This is where the idea of a secure connection really shines. It's about making sure that only you, or people you allow, can get to your Pi and its contents. So, how does this whole Raspberry Pi tunnel SSH thing help keep everything protected, you might ask?
One of the best ways to get to your Raspberry Pi using SSH or VNC from any place in the world is by using a service like Cloudflare's Zero Trust. This kind of setup means you're not just opening up your Pi to the internet directly. Instead, you're creating a protected pathway through a trusted service. This adds a layer of security that helps keep out unwanted visitors, which is really helpful, actually.
When you set up a Cloudflare tunnel on your Raspberry Pi, it makes a secure connection to Cloudflare. This connection is like a private road that only your Pi and Cloudflare know about. It means your data travels along this protected path, keeping it away from the general public internet. This is a good way to manage access to your devices, especially if they are always on and connected, so it's a smart move.
Secure Connections for Raspberry Pi Tunnel SSH
SFTP, which is a way to move files around safely, uses a service on your Raspberry Pi called SSH. This service lets you move data in a protected way. So, before you can use SFTP, you need to turn on SSH on your Raspberry Pi. After that, you create a tunnel to get to SSH through a service like pitunnel.com. This makes sure that when you send files, they are wrapped up in a secure package, which is pretty important.
It's a good idea to follow guides on how to set up SSH sessions first. Once you've got that down, you can come back to using SFTP to connect to your Raspberry Pi. This step-by-step approach helps make sure everything is set up correctly and safely. The whole point is to make sure your connections are private and that your information doesn't fall into the wrong hands, you know?
There are also tools and communities, like GitHub, where people work together on projects like igor47/pitunnel development. This kind of open sharing helps make these tools better and more secure for everyone. It's a way for many people to contribute to making remote access more reliable and safer, which is quite nice.
Different Ways to Set Up Raspberry Pi Tunnel SSH
When it comes to getting your Raspberry Pi connected from afar, there isn't just one way to do it. You have a few different paths you can take, each with its own benefits. Some methods might be simpler to set up for a quick connection, while others offer more features for long-term, very protected access. The important thing is finding the method that best fits what you need to do with your Pi, so there's a bit of choice involved.
One popular way involves using secure SSH reverse proxy tunnels, which are offered by services like SocketXP. These tunnels let you get to and control your Raspberry Pi and other smart devices, even if they are behind a home router or a firewall that usually blocks outside connections. It's like these services help your Pi poke a hole through those barriers, but in a very controlled and safe way, which is quite clever.
A secure reverse SSH tunnel is a special way of using codes to get to your Raspberry Pi from far away. It gives you a safe and protected way for two different networks to talk to each other. This is especially helpful when your Raspberry Pi is sitting on a private network, behind a firewall or a network address translator (NAT), which usually stops direct access from the outside. In this kind of setup, your Pi reaches out first, making the connection, which is a key difference.
Cloudflare and Raspberry Pi Tunnel SSH - A Closer Look
A good guide can walk you through the steps of setting up secure remote access to your Raspberry Pi using a Cloudflare tunnel, and the best part is, you don't need to do any port forwarding. Port forwarding can sometimes be a bit of a headache to set up on your home router, and it can also open up your network in ways you might not want. So, avoiding that step makes things much simpler and often safer, too.
I recently got my Raspberry Pi, and one of the first things I managed to do was connect to it using SSH through a tool called PuTTY, and also see its screen with TightVNC Viewer. This was when my connecting device was on the same home network. Later that day, I was also able to connect using SSH while I was on a different network, after I had set up a port for forwarding. This shows how useful these connections can be, you know?
Using a Cloudflare tunnel means your Pi connects to Cloudflare's network, and then you can access your Pi through Cloudflare. This can be done using something like an auditable terminal, right from your web browser. It's a very streamlined way to get to your Pi, without needing a lot of special software on your connecting device. It makes remote access feel very smooth, actually.
Pitunnel.com and Raspberry Pi Tunnel SSH - Easy Access
Custom tunnels, like those created through pitunnel.com, give you a very direct way to access your Raspberry Pi's SSH. You get a unique address, like pitunnel.com:12345, which acts as your personal gateway to your Pi. This simplifies the process quite a bit, as you don't have to worry about complicated network settings on your end. It's designed to be straightforward for users who want a quick way to connect.
The process of creating these tunnels usually involves just a single command typed into your Raspberry Pi's terminal. This command tells your Pi to establish the connection to the service, and then the service gives you the external address. It's a pretty user-friendly setup, making it easier for people who might not be experts in networking to get their Pi online and accessible from anywhere. So, it really takes some of the guesswork out of it.
Once the tunnel is up and running, you can expose services like SSH or VNC on your Raspberry Pi to the open internet, or use them within a private network. This flexibility means you can tailor how accessible your Pi is, depending on what you need to do. It’s about giving you control over your device, wherever you are, which is quite liberating, in a way.
Are There Other Options for Raspberry Pi Tunnel SSH?
Beyond the common ways of setting up a connection, you might wonder if there are other clever methods for getting to your Raspberry Pi. Sometimes, the usual approach might not fit your specific situation, or you might be looking for an extra layer of security or a different kind of connection flow. Luckily, there are indeed other choices available when it comes to Raspberry Pi tunnel SSH. It's worth exploring these alternatives to find the best fit for your personal needs, you know?
One idea is to limit who can get to your Pi by setting something called "gatewayports no." This means that only people who are already logged into the server that's hosting the tunnel could get to your Raspberry Pi using SSH. It's an extra step to make sure only authorized users can reach your device, which adds another layer of protection. This can be a really good option if you're very concerned about who has access, actually.
Another option is something called a "reverse SSH tunnel," and it's a good alternative to the standard setup. Instead of your main computer connecting to the Raspberry Pi, the Raspberry Pi itself starts the connection to a control server. This is a technique used by many programs that need to reach out from inside a network, and it's quite effective for getting around firewalls or other network restrictions. It flips the usual connection idea on its head, so it's a bit different.
Reverse SSH for Raspberry Pi Tunnel SSH - Another Path
Let's look at how a reverse SSH connection works. Imagine your Pi is trying to connect to a server at a specific address, say 25.25.25.25, using a username like "serveruser." When it makes this connection, it also tells that server to open a specific door, let's say port 2222. Any connections that come into the server on that specific door are then sent back through the tunnel to your Pi, to its own SSH door, which is usually port 22. So, it's like the Pi is creating a pathway for itself to be reached, which is pretty clever.
Once the Pi sets up that remote tunnel, it means that even though your Pi is behind your home network, the server can now "see" it through that open door. This is how I set up my Pi 400 on my home network. I used a Cloudflare tunnel to connect it to the Cloudflare network, and then I used an auditable terminal to get to the Pi 400 through Cloudflare and the tunnel, using just a web browser. It shows how powerful these reverse connections can be, in a way.
This method is particularly useful because it lets your Pi initiate the connection outwards, which is often allowed by firewalls. Firewalls typically block incoming connections but are more lenient with outgoing ones. By having the Pi start the conversation, you bypass many of the common hurdles of remote access. It's a very practical solution for reaching devices that are otherwise hard to get to, you know?
Getting Started with Raspberry Pi Tunnel SSH - What to Know?
So, you're ready to try setting up one of these handy tunnels for your Raspberry Pi. It's a great step towards having more control over your device, no matter where you are. Before you jump in, there are a few basic things that are good to know. Having a little bit of background knowledge can make the whole process smoother and help you understand what's happening behind the scenes. So, what should you keep in mind as you begin your journey with Raspberry Pi tunnel SSH?
First off, you'll need to make sure SSH is turned on within your Raspberry Pi. This is a fundamental step, as the tunnels rely on SSH to do their work. It's usually a straightforward setting you can enable in your Pi's configuration. Once that's done, your Pi is ready to accept commands and begin building those protected connections. It's like making sure the lights are on before you try to plug something in, you know?
You'll also want to choose which kind of tunnel service or method you want to use. As we talked about, there are options like pitunnel.com, Cloudflare tunnels, or even setting up a reverse SSH connection directly. Each has its own way of doing things, and some might be easier for beginners than others. Picking the right one for your comfort level and what you want to achieve is a good starting point, actually.
Finally, remember that while these tunnels make things much safer than direct exposure, keeping your Raspberry Pi's software updated and using strong passwords are still very important. These are general good practices for any device connected to the internet. Combining a well-set-up tunnel with good basic security habits will give you the best peace of mind when you're connecting to your Pi from afar. It's about being smart and protected, which is always a good thing.
This article has gone over how you can use SSH tunnels to get to your Raspberry Pi from anywhere, keeping your connection safe. We talked about how custom tunnels work with services like pitunnel.com and how they let you expose SSH or VNC. We also looked at how secure SSH protects your data by encrypting your connection and explored options like Cloudflare's Zero Trust for setting up secure tunnels without port forwarding. We covered how SFTP uses SSH for safe data transfer and mentioned reverse SSH tunnels as another way to connect, especially when your Pi is behind a firewall. The article also touched on practical steps for getting started, like enabling SSH on your Pi and understanding different setup methods.
- The Rookie Where To Watch
- Guerdy Abraira Net Worth
- Securely Connect Raspberry Pi With The Vpc Network And Remote Iot P2p
- Godlikeproductions Com
- The Mole Hannah And Tony

How to SSH Into a Raspberry Pi for Remote Access
SSH tunnel to Raspberry Pi
PiTunnel - Access your Raspberry Pi projects from anywhere
